Head-Down 304 — Fly base on a head-down big-way
version 2026-07-28
Prerequisites
Application
Covers flying a base slot on a head-down big-way: launching and stacking up the base, steering it onto heading, holding heading and fall rate as the formation’s clock, absorbing docks and knocks without corking, and executing the breakoff the organiser designed. Every float and diver (FFP-HD302, FFP-HD303) sets their sight picture off a base that must not move.
This is the authoritative home for the base and exit theory at big-way depth; FFP-HD301 carries the same slot craft at small-group scale. Assumes HD301; base slots are usually organiser-picked. Sky only.
Regulatory context (worldwide)
as for the other big-way cards, head-down jumps of more than 3 parachutists need a Freefly Crest, Head-Down and more than 10 need a Star Crest (OR 9.2.2, 9.1.3); separate at least 1,000 ft above deployment (OR 9.1.4); audible mandatory (OR 9.2.3). “OR” is the APF Operational Regulations. Follow your federation and drop zone.
Acronym key. APF, Australian Parachute Federation. Op Regs / OR, the APF Operational Regulations. TOM, the APF Training Operations Manual. RBT, the recommended (basic) training tables in the APF Freefly and Angles Guide. RS, the APF regulatory schedules (crest requirements). FFC, freefly crest. CI, chief instructor. DZSO, drop zone safety officer.
USPA SIM, the United States Parachute Association Skydiver’s Information Manual. CSPA, Canadian Sport Parachuting Association.
Pre-requisite units
FFP-HD301, and ideally FFP-HD302 and FFP-HD303 so the base flyer knows the approach, overfloating and diver doctrine they are flying against. RPL route: logbook evidence of base slots on organised head-down big-ways plus one challenge jump against this card’s criteria.
The base is the clock
Every float and diver on the load sets their sight picture, closure and level off the base. If the base drifts off heading, changes fall rate or corks, it defeats every approach at once. The base’s whole job is to be a steady, predictable reference. Everything below serves that.
(All left/right below assumes a port-side door, reverse for starboard.)
The four base slots
Inside Centre keys the exit and generally leads. If the jump has a leader, it is Inside Centre. Stacked inside the plane to the rear; the formation’s heading and fall-rate reference sits here.
Front Float is the anchor, the heaviest-person slot. Back to prop blast, hanging from the left arm, left foot on the door centre, right foot further aft. A heavy flyer here pulls the formation down out the door without letting it over-rotate. A light flyer on Front Float lets the base over-rotate on exit; put the heaviest jumper here.
Outside Centre steers the base. This is the deputy job, and it carries more responsibility than its billing suggests. Outside Centre sets up on Front Float’s right shoulder, back to prop blast, and steers the formation onto heading while staying stable and on level with Inside Centre.
Why the base is steered to face jump run at all: on a big-way, the divers and floaters need slot-specific approach lanes, and those lanes only exist if the base is oriented to the flight line. Divers arrive down the flight line, behind Inside Centre; floaters come from behind Outside Centre’s shoulder. Steer the base off jump run and those lanes collapse into each other.
This is why base steering is a big-way job and not a standalone-4-way one, a lone 4-way with no one joining has no lanes to make, so it does not need jump-run orientation (see FFP-HD301, which keeps the small-group slot mechanics without this steering requirement). The mechanics:
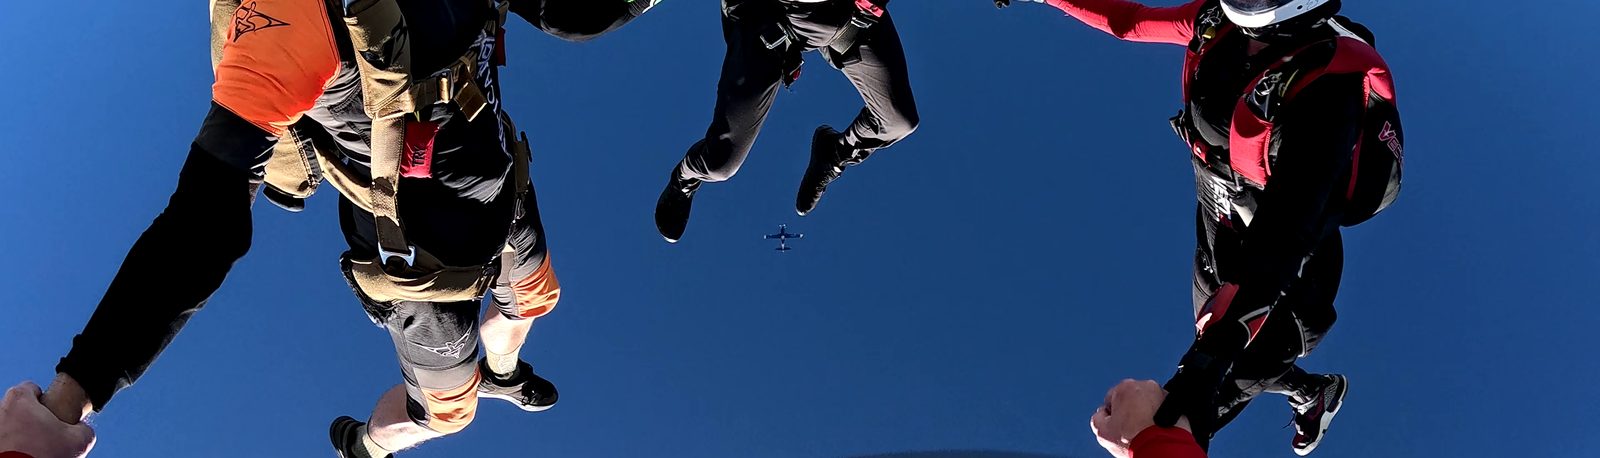
Outside Centre’s point of view once the base is on heading: the aircraft sits between Inside Centre’s legs. That orientation is what opens the two approach lanes, divers arriving down the flight line behind Inside Centre, floaters coming from behind Outside Centre’s shoulder.
- Watch the underside of the aircraft, not the formation. Steer so the aircraft’s path down jump run finishes behind Inside Centre, the sight picture is the plane between Inside Centre’s legs.
- Manage the rotation, which has three cases.
- A no-rotation exit finishes needing about 90° of rotation to the right shoulder to set heading.
- A slow natural right rotation is stopped on heading with anti-rotation to the left.
- A messy exit typically rotates rapidly onto the base’s left shoulders and needs firm counter-rotation to the right.
- Anticipate the messy case, it is the common one on a rough launch.
Tail is the aft slot, and the disorienting one. Ideally light and reasonably tall. Climbs out before Inside Centre; stand tall on climb-out and watch for handle snags on the top of the door frame. As Inside Centre climbs out, at the right moment: left foot aft, hips rotate to face the front of the plane, right foot slightly bent with the sole pushing on the rear threshold.
The right arm reaches over the left into the flower grip; the torso lays on the left arm; the head comes way down, stacking with the other three, hips squared to the plane’s travel.
The Tail failure mode is the “flop”. If Tail is too heavy, does not reach over far enough, or brings too much exit momentum, they go near-horizontal with their back to the wind, build energy that releases and springs them up and over the group, corking themselves or over-rotating the base head-up.
The keys against it: be light, lean far over, rotate out of the plane with the group (be pulled by it, not left behind), strong in the arms (keep pushing the group down; don’t let the grip ride up to the chest), gentle in the legs (no straight-leg stall on the wind that springs the group back the way it came).
Launch, stack-up and holding the clock
The base launches on Inside Centre’s key. Grips and heading set through the hill; additional floats stack up outside the door for a bigger base. Once out, the base’s job is to become the steady reference: Inside Centre holds heading and levels, Outside Centre finishes and holds the rotation, Front Float keeps the anchor down.
Then the base holds fall rate steady as the reference for every approaching flyer and absorbs docks without being driven down.
Taking a knock without corking. When an incoming stinger or a bump knocks the base, the reflex to spread the legs is exactly wrong, spreading slows the flyer and pops them up into traffic. Instead: tuck the chin, close the legs and go faster. Closing up and driving down keeps the base on level. This is period big-way discipline and it is the same “ball up, don’t cork” rule the group unit teaches, at big-way stakes.
The base executes the breakoff (design belongs to the organiser)
On a big-way the staged breakoff altitudes carry the separation load, not the raw fan angle, but the design of that breakoff (the waves, the altitude tables, the fan-out arc, who shades near jump run) is the organiser’s job, in FFP-HD401. The base flyer’s job is to execute the briefed base wave cleanly.
That sequence: break grips, turn 180° from the formation, clear the airspace behind, peel onto the back clearing the airspace above, rotate to belly and keep clearing, decelerate, then deploy. Turn 180° first, tracking off without turning out risks being cut across by another jumper’s line. In a crowded break-off column, be ready to steer on the rear risers off opening.
Elements and performance criteria
1. Plan the jump
- 1.1
- State own base slot, grips and heading reference from the organiser's brief.
- 1.2
- Confirm the exit stack order and the base's launch count.
- 1.3
- State the briefed breakoff, own wave, altitude, radial and deployment altitude, confirming own wave banks at least 1,000 ft between breakoff and deployment.
- 1.4
- Confirm own currency and qualifications against the organiser's entry criteria and the local entry requirements.
2. Prepare
- 2.1
- Complete a freefly-specific gear check (handles, hand-deploy pouch, riser covers, closing loop, helmet, audible set to the base wave and functioning).
- 2.2
- Walk the base launch in the mock-up in the briefed grip order.
- 2.3
- Dirt-dive the launch, heading hold, dock absorption and breakoff sequence at least twice.
3. Perform
- 3.1
- Launch the base on the briefed count, setting grips and heading through the hill without contacting the aircraft.
- 3.2
- Fly own base slot's exit role, Front Float anchoring down without over-rotation; Outside Centre steering the aircraft's path to finish between Inside Centre's legs and managing the rotation case; Tail rotating out with the group, head low, legs relaxed.
- 3.3
- Hold heading and levels with the leader, arresting base rotation with anti-rotation toward the correct shoulder.
- 3.4
- Hold fall rate steady as the reference for every approaching flyer, absorbing docks without being driven down.
- 3.5
- Take a knock without corking, tuck the chin, close the legs and go faster; do not spread the legs.
- 3.6
- Present arms for the incoming stingers and hold the head-level stepping the organiser briefed.
- 3.7
- Hold the base's slot rather than chasing a lost stinger, a base that moves defeats every sight picture on the load.
4. Complete
- 4.1
- Initiate breakoff at the briefed base-wave altitude (within −0/+300 ft), regardless of formation completeness.
- 4.2
- Break grips, turn 180° from the formation, clear airspace, peel onto the back clearing above, rotate to belly and keep clearing, decelerate, then deploy, turning 180° before tracking, or risk being cut across by another jumper's line.
- 4.3
- Track the assigned radial, shading away from jump run if briefed.
- 4.4
- Deploy at the base wave's briefed altitude after checking airspace, ready on the rear risers in a crowded column; barrel roll only if smooth.
- 4.5
- Fly the briefed canopy separation and landing order.
5. Review
- 5.1
- Debrief the base's heading, fall rate and breakoff against video.
- 5.2
- Contribute observations of exit, traffic and breakoff to the organiser's debrief.
- 5.3
- Write the jump up naming the unit and slot (e.g. "HD304, Outside Centre, wave-2 breakoff"), the results and the next objective.
Bold criteria are safety-critical: strongly recommended must-meet standards within FFP courses. A base breakoff or deployment error, or a base that corks under a knock, risks the whole load, so a Not Yet Satisfactory on a bold criterion makes the unit Not Yet Competent. Regulation remains your federation’s and your drop zone’s.
Foundation skills
Reading the organiser’s engineering brief (slot roles, exit stack, breakoff waves). Altitude and separation numeracy across the base wave’s margins. Quiet-body discipline: holding heading, level and fall rate while task-loaded and under docks.
Performance evidence (suggested sufficiency, adjust locally)
A guide to how long the base slot usually takes; competency against the criteria is the standard. Around 8 organised head-down big-way jumps flying a base slot, 6-way or larger, some at 10-way or larger and a couple flown to a staged breakoff, across at least two events or days, with consecutive jumps meeting all criteria without organiser prompts.
Tunnel time cannot substitute, the launch, the stack-up and the staged breakoff exist only in the sky.
Knowledge evidence
- Describe the four base slots (Inside Centre, Front Float, Outside Centre, Tail) and each one’s exit role, grips and climb-out order.
- Explain the heaviest-on-Front-Float anchor logic, the heavy flyer pulls the base down without over-rotation, and a light flyer there lets it over-rotate.
- Explain the Outside Centre sight picture (plane between Inside Centre’s legs) and the three rotation cases: no-rotation needs ~90° to the right shoulder.
- Slow right rotation is stopped with anti-rotation left.
- A messy exit rotates rapidly left and needs firm counter-rotation right.
- Explain the Tail “flop” failure mode (too heavy, insufficient reach, excess momentum, straight-leg stall) and its prevention.
- Explain the climb-out handle-snag hazard and why the flyer protects handles and checks them for clearance throughout climb-out.
- Describe how to take a knock without corking (tuck chin, close legs, go faster; do not spread) and why spreading pops the base up into diver traffic.
- Describe the base-wave breakoff sequence and why turning 180° before tracking is critical.
- Explain why holding the base’s slot beats chasing a lost stinger.
Assessment conditions
Sky only, on organised head-down big-way jumps of a recommended 6-way minimum, with some evidence at 10-way or larger. A real group is required. Exit altitude a recommended 10,000 ft minimum, higher for big-ways to give the base build time plus the staged breakoff.
Video: outside footage is the most valuable base debrief; where none is practical, organiser observation and other jumpers’ footage can carry the debrief with the candidate identifiable. Equipment: visual altimeter, functioning audible (two recommended, wave-set), AAD highly recommended, freefly-suitable gear.
Assessor: an experienced head-down big-way organiser or freefly coach current in the discipline, using the published FFP-HD304 checklist. Each criterion Satisfactory / Not Yet Satisfactory; unit Competent / Not Yet Competent, recorded as a milestone.
Regulatory context
Australia: an APF Freefly Coach; elsewhere: national or drop-zone equivalent, participation gates are regulatory, see Application
Acronym key. APF, Australian Parachute Federation. Op Regs / OR, the APF Operational Regulations. TOM, the APF Training Operations Manual. RBT, the recommended (basic) training tables in the APF Freefly and Angles Guide. RS, the APF regulatory schedules (crest requirements). FFC, freefly crest. CI, chief instructor. DZSO, drop zone safety officer.
USPA SIM, the United States Parachute Association Skydiver’s Information Manual. CSPA, Canadian Sport Parachuting Association.
Coaching priorities
Deliver in the project’s priority order: Safety → Fun → Learning (curriculum Part A0). Safety criteria are must-meet, the base breaks off on its wave altitude regardless of formation completeness, and a base that holds its slot is doing its job. The coach runs debriefs without blame and ends each one on a win with one focus for the next jump.
RPL evidence set
For experienced base flyers the flying is the evidence. A logbook history of organised head-down big-way base participation; video showing a steady base under docks and a clean wave breakoff on the assigned radial; a word from a recognised organiser. A challenge jump against this checklist with the base and breakoff knowledge covered in conversation completes the picture.
Sources
The evidence behind this unit
- The project’s coaching doctrine: HD 4-way exit positions in depth, base launch and stack-up, taking a knock without corking, and the base-wave breakoff sequence (the project’s coaching doctrine Part 1).
- Inside Centre keys/leads.
- Front Float anchor.
- Outside Centre steering, the sight picture and the three rotation cases.
- Tail mechanics and the “flop”.
- Head-down official-sources research, APF006 §3.2–3.3 (airspace check, pull-don’t-out-track); OR 9.1.3, 9.1.4, 9.2.2(c), 9.2.3; TOM §5.7.1 (group-size matrix).
- Australian Skydiver Magazine archive, ASM 68 p.64–65 (taking a knock without corking; the turn-180°-first breakoff rule; rear-riser deployment in crowded columns).
- Learning-frameworks research §7, unit template, non-compensable safety criteria, RPL design.
Suggest a change to this page open
Spotted an error, or know something this page should cover? Tell us. We read every suggestion, and work accepted changes into the site.
The coaching priority stack
Safety → Fun → Learning
Every course, jump card, briefing and debrief is designed and delivered in this order. Coaches hold it under pressure: never trade safety for fun, never trade fun for learning throughput.
- 01 Safety
Non-negotiable, always first. Safety-critical criteria are never traded for anything below this line.
- 02 Fun
Flyers choose an expensive hobby for love. Enjoyable coaching keeps them inside the system where the standards apply. Fun is itself a safety mechanism.
- 03 Learning
The structured outcomes. Learning sticks best when the jump was safe and fun, because motivation sustains deliberate practice.